
In Box Review of Italeri 1/35TH Scale
LVT-4 Water Buffalo
Kit no. 379
By Ray Mehlberger
Out of production
By Ray Mehlberger
Out of production
HISTORY:
This type of tracked amphibian vehicle was developed for the U.S. Armed Forces at the beginning of WWII to ascertain mobility in swampy terrain and at the beaches during landing operations. This version was typical with its wide rear ramp which could be lowered to move equipment and troops. More than 6,000 units were produced from the end of 1943 onward. LTVs were widely used in the Pacific Theater as well as on various European battle grounds to cross big rivers.
Tech Data:
Length: 7.95m
Width: 3.25m
Height: 2.64m
Weight: 13,700kg
Max. Speed in water/on land : 25km/h
Range in Water: 320 km
Range on Land: 480 km
Armament: 2 x .30 cal. and 2 x .50 cal. machine-guns
THE KIT:
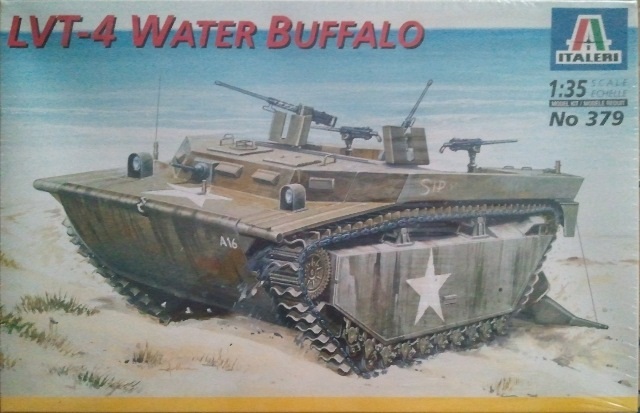
This kit came in a shrink-wrapped tray and lid type box.
The box art shows the LVT parked on a beach with the rear loading ramp down. It is in a heavily streaked overall olive drab, with
WHAT’S IN THE BOX:
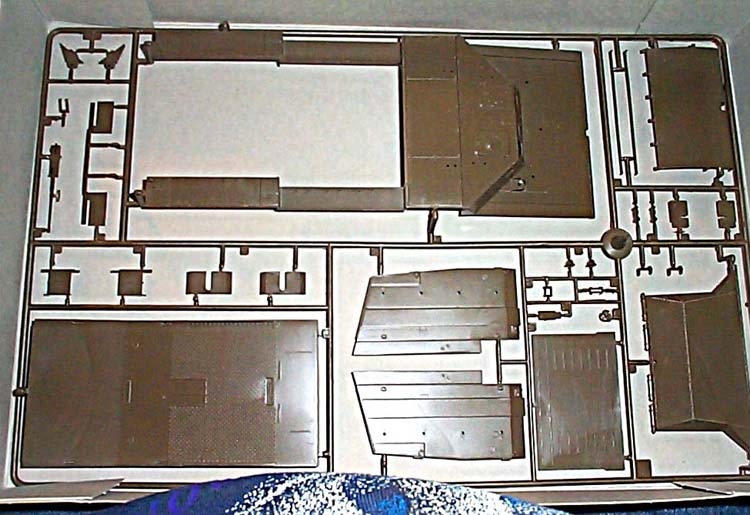
The kit holds two large and one medium sized sprue of olive green parts. A small sprue, in the only cello bag in the kit, holds the decals and a short piece of tan string. The string is to be used for the pulley arrangement on the rear cargo door of the vehicle. I wish that Italeri would use better packaging in their kits as parts get broken off their naked trees and could very easily become lost.
There are no clear parts or crew figures provided in the kit.
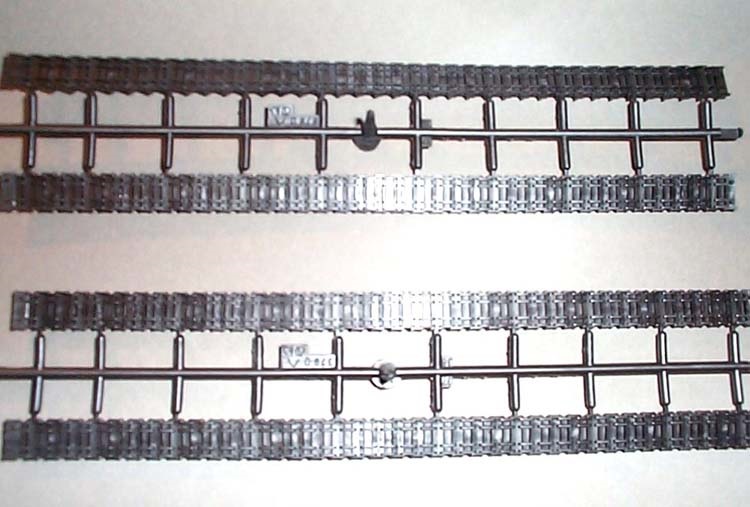
Continuous rubber band treads are provided in four sections. This means that the modeler will have to do two hot rivets with a heated screw-driver, on each side, to assemble these later. Not a good thing to look forward to.
The instructions are a single sheet, that accordion folds out into 10 pages in 7 ¾” x 13” page format.
Page one gives the history of the vehicle in no less than a dozen different languages, including English.
Page two gives general instructions for parts removal from the trees, again in 12 languages. There are six part replacement reply labels printed next and a number code explanation for the colors to be used in painting the kit.
Page three is the parts tree drawings.
Pages four through the top half of page eight give 17 assembly steps. The bottom of page eight and all of page nine gives the marking instructions for three different schemes.
The decal sheet gives markings for three different schemes:
Page ten gives some warnings about possible hazards in 20 languages.
Large tree, letter 'A' holds the bottom, inner sides, drive sprockets, return rollers, idler wheels, no less than 20 road wheels, 2 x .30cal. and 1 x .50cal. machine-guns and their mounts, two boat hook poles, grab handles (three of these handles are spares) etc. (83 parts here)
This type of tracked amphibian vehicle was developed for the U.S. Armed Forces at the beginning of WWII to ascertain mobility in swampy terrain and at the beaches during landing operations. This version was typical with its wide rear ramp which could be lowered to move equipment and troops. More than 6,000 units were produced from the end of 1943 onward. LTVs were widely used in the Pacific Theater as well as on various European battle grounds to cross big rivers.
Tech Data:
Length: 7.95m
Width: 3.25m
Height: 2.64m
Weight: 13,700kg
Max. Speed in water/on land : 25km/h
Range in Water: 320 km
Range on Land: 480 km
Armament: 2 x .30 cal. and 2 x .50 cal. machine-guns
THE KIT:
This kit came in a shrink-wrapped tray and lid type box.
The box art shows the LVT parked on a beach with the rear loading ramp down. It is in a heavily streaked overall olive drab, with
WHAT’S IN THE BOX:
The kit holds two large and one medium sized sprue of olive green parts. A small sprue, in the only cello bag in the kit, holds the decals and a short piece of tan string. The string is to be used for the pulley arrangement on the rear cargo door of the vehicle. I wish that Italeri would use better packaging in their kits as parts get broken off their naked trees and could very easily become lost.
There are no clear parts or crew figures provided in the kit.
Continuous rubber band treads are provided in four sections. This means that the modeler will have to do two hot rivets with a heated screw-driver, on each side, to assemble these later. Not a good thing to look forward to.
The instructions are a single sheet, that accordion folds out into 10 pages in 7 ¾” x 13” page format.
Page one gives the history of the vehicle in no less than a dozen different languages, including English.
Page two gives general instructions for parts removal from the trees, again in 12 languages. There are six part replacement reply labels printed next and a number code explanation for the colors to be used in painting the kit.
Page three is the parts tree drawings.
Pages four through the top half of page eight give 17 assembly steps. The bottom of page eight and all of page nine gives the marking instructions for three different schemes.
The decal sheet gives markings for three different schemes:
- 1. A U.S. Marine vehicle, 1944 (no geographical area is called out)
- 2. A French Army vehicle, 1956 (again no geographical area mentioned)
- 3. An Italian Army vehicle, 1957 (ditto)
Page ten gives some warnings about possible hazards in 20 languages.
Large tree, letter 'A' holds the bottom, inner sides, drive sprockets, return rollers, idler wheels, no less than 20 road wheels, 2 x .30cal. and 1 x .50cal. machine-guns and their mounts, two boat hook poles, grab handles (three of these handles are spares) etc. (83 parts here)

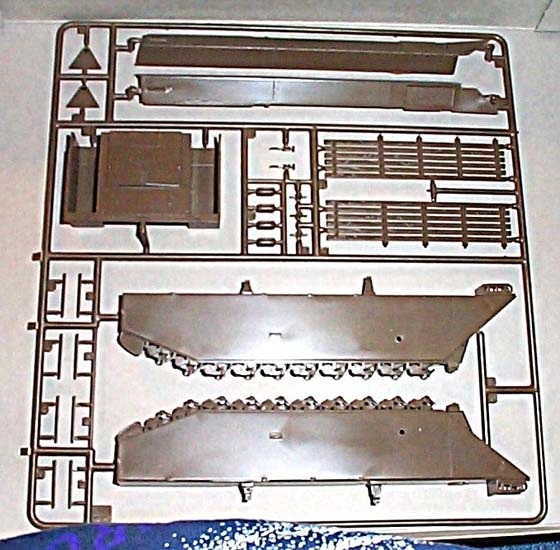
Large tree, letter 'B' holds the floor, interior wall sections, upper decking, bow pieces, rear fold-down door, machine-gun shields, and a second .50cal. machine gun etc. (30 parts here)
Medium sized tree, Letter 'C" gives us the outer sponson walls, sponson tops, front fighting compartment wall, vision flaps, slatted panels (that can be positioned either verically or horizontally), these panel's supports, and tail gate hinge plates etc. (26 parts here)
Conclusion
This vehicle was long wanted by armor modelers. It filled an important niche in any armor collection.
Parts are flash free and well molded. However, as mentioned before, Italeri could cello bag their parts in their kits. I only found one molding problem on the kit. There are 2 rivets in the side parts at the rear of them. These are in the center of a shrink mark. It will have to be puttied, sanded level and then the two rivets added.
I don't like the four part rubber band tracks. One hot screw-driver weld, per side, is ENOUGH and usually a disaster waiting to happen. At least for me it is. Also, clear head light lenses would have been nice to have.
Perhaps one of the after-market companies, that does individual tread links, will do some for this kit in the future. Are you listening Model Kasten?? Hope so anyways.
I did purchase the Eduard PE set designed for this Italeri kit. It includes self-adhering stickers to mask the star and invasion stripes for spray painting on. Eduard also made a mistake at the factory and I got an extra one of the 2 frets in the kit. The set is number 35358.
I did purchase the Eduard PE set designed for this Italeri kit. It includes self-adhering stickers to mask the star and invasion stripes for spray painting on. Eduard also made a mistake at the factory and I got an extra one of the 2 frets in the kit. The set is number 35358.


With the few reservations, previously mentioned above, I highly recommend this new kit.
Italeri is perhaps one of the easiest brands to find in any well stocked hobby shop.
This kit began as Italeri kit no. 379 in 2000.
It was released again by them in 2001 as the LVT(A)1 with a turret, kit no. 6384.
Revell of Germany did it in 2002 as kit no 03055 in original form.
Italeri re-did it again as LTV(A)-4 in 2003, kit no.6396.
Italeri did it again as LVT-2 Amtrac in 2007, kit no. 6462.
Italeri did it again as LVT(A)-2 “Saipan” with twin turrets in 2008, kit no. 6470.
DML Dragon did a LVT-4 in 2012, kit no. 9134. However, I don’t know if it is an original DML mold or a re-pop of Italeri.
Recommended to modelers of average building skills. I purchased my kit years ago at my local hobby shop.
